If you are building a website with WordPress, you have probably heard the phrase 「Nginx FastCGI Cache is a performance booster」. But those who have actually used it know that the default caching rules are either too aggressive, caching the admin area as well, or too conservative, rendering almost no effect. WP Panel「s approach is:Turn Nginx caching into an out-of-the-box server-side acceleration, with smart bypass covering all common scenarios by default, while opening a custom entry for advanced users to precisely control.
I. What is WP Panel's cache? What's the difference from installing a caching plugin?
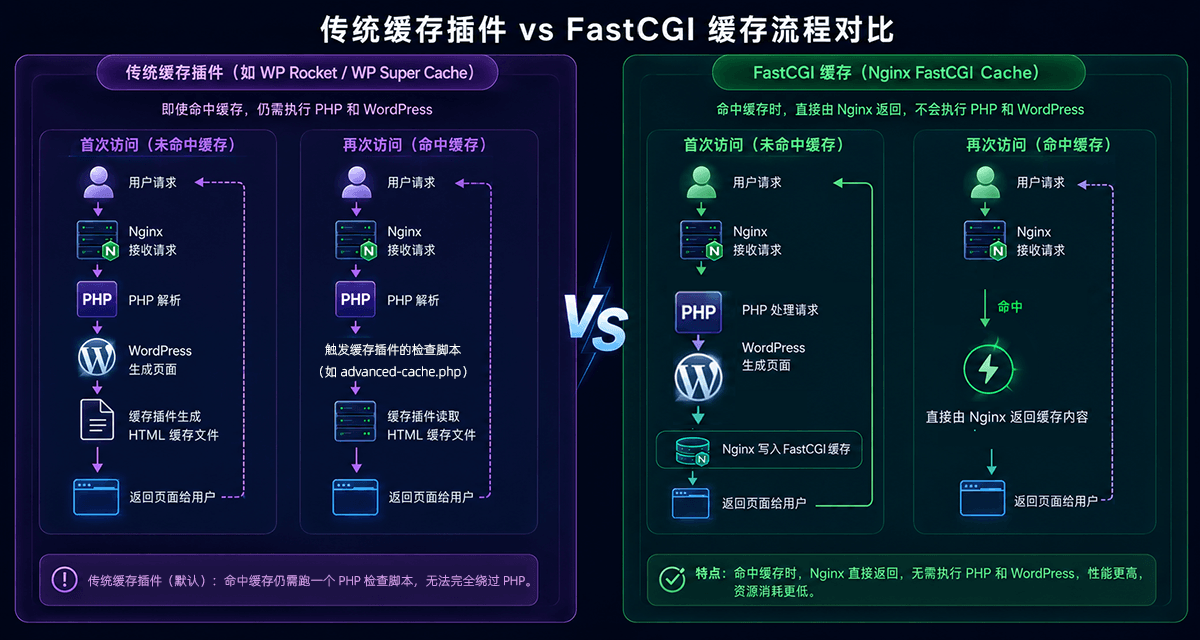
Most WordPress caching plugins on the market (WP Rocket, W3 Total Cache, LiteSpeed Cache) perform page caching at the PHP level Do page caching:
用户请求
↓
请求到达 Nginx
↓
转发给 PHP-FPM
↓
WordPress 加载
↓
插件判断是否返回缓存
Even this path is fast, it still goes through the full startup process of PHP and WordPress.
WP Panel's FastCGI cache runs directly at the Nginx level:
用户请求
↓
请求到达 Nginx
↓
Nginx 命中缓存
↓
直接返回 HTML(不经过 PHP)
, without PHP execution, without loading WordPress, without querying the database. The improvement for high-concurrency scenarios is orders of magnitude.
And WP Panel does not require you to manually tinker with fastcgi_cache_path、fastcgi_cache_key these directives.Automatically configured when creating a site, automatically cleared when deleting a site, completely seamless.
II. What smart bypass scenarios are covered by default?
The biggest fear with caching is 「caching what should not be cached」. WP Panel has built-in complete bypass rules in the Nginx template, with two sets of strategies for WordPress sites and generic PHP sites:
WordPress sites (default site type)
| Bypass condition | Specific rule | Why |
|---|---|---|
| Request method | POST requests automatically skip cache | Write operations such as form submissions, comments, logins cannot be cached |
| Query parameters | URLs with ? parameters automatically skip | ?s=搜索词、?utm_source=xxx dynamic requests |
| Login Cookie | wordpress_logged_in、wordpress_sec_、wp-settings- | Content seen by logged-in users is personalized and must be rendered in real time |
| Comment Cookie | comment_author | Visitors who just commented see a 「Pending Review」 prompt, which cannot be cached |
| E-commerce Cookie | woocommerce、wp_woocommerce_session | Cart, checkout, and order status differ per user |
| Password Reset | wp-resetpass | The password reset process must be real-time |
| Admin Path | /wp-admin/、/wp-login.php | The admin interface must never be cached |
| Multisite Registration | /wp-signup.php | WordPress multisite registration pages cannot be cached |
| E-commerce Pages | /cart/、/checkout/、/my-account/ | Cart and checkout pages differ per user |
In a nutshell: articles and pages seen by regular visitors use Nginx fast cache, while logged-in users, e-commerce carts, and admin operations automatically go through PHP real-time processing.This strategy works for most WordPress sites directly, with no extra configuration needed.
Generic PHP Sites
For non-WordPress PHP applications, WP Panel uses a conservative strategy:Only bypass POST requests and requests with query parameters. Since generic PHP sites have no unified login cookie naming convention, over-blocking may actually cause cache invalidation.
III. Cache Performance Parameters at a Glance
The Nginx cache configuration generated by WP Panel is not a minimal setup but follows production standards:
| Parameter | 值 | Purpose |
|---|---|---|
| Cache Storage Path | /var/cache/nginx/fastcgi | Use /var/cache partition, isolated from system temporary files |
| Cache Zone Size (Memory) | 200MB keys_zone | 200MB memory index, no slowdown even with millions of pages |
| Disk Limit | 2GB | Automatically evict old cache to avoid disk overflow |
| Cache expiration time | Configurable (default value see site settings) | Per-site independent settings |
| Cache lock | Enabled | When multiple users access the same page simultaneously, cache is generated only once |
| Graceful degradation | error / timeout / updating / 500 | Automatically return expired cache when backend fails, keeping the site online |
| Cache status header | X-FastCGI-Cache | Response header directly shows HIT/MISS/BYPASS for easy debugging |
4. Real response header verification: origin cache + CDN edge cache double hit
Page response headers of a live WordPress site (with WP Panel FastCGI cache + Alibaba Cloud ESA full-site acceleration):
x-fastcgi-cache: HIT
x-site-cache-status: HIT
x-swift-cachetime: 1800
x-swift-savetime: Sat, 13 Jun 2026 15:11:11 GMT
server: ESA
Line-by-line interpretation:
| Header | 值 | Meaning |
|---|---|---|
x-fastcgi-cache | HIT | WP Panel's Nginx FastCGI cache hit. Origin server returns HTML directly, without PHP and WordPress |
x-site-cache-status | HIT | Alibaba Cloud Edge Security Acceleration (ESA) also hit |
x-swift-cachetime | 1800 | CDN edge node cache TTL = 30 minutes |
x-swift-savetime | Timestamp | CDN layer cache write time, used to determine cache freshness |
server | ESA | Alibaba Cloud Edge Security Acceleration |
How many layers did this request actually go through?
In the entire request chain, data never reached PHP:
用户请求
  → ESA 边缘节点(via 链末尾标记 H — 命中,直接返回)
     ↓ 边缘 MISS 才回源
  → 源站 Nginx FastCGI Cache(x-fastcgi-cache: HIT — 命中)
     ↓ 源站 MISS 才到后端
  → PHP-FPM → WordPress(这一步完全没触发)
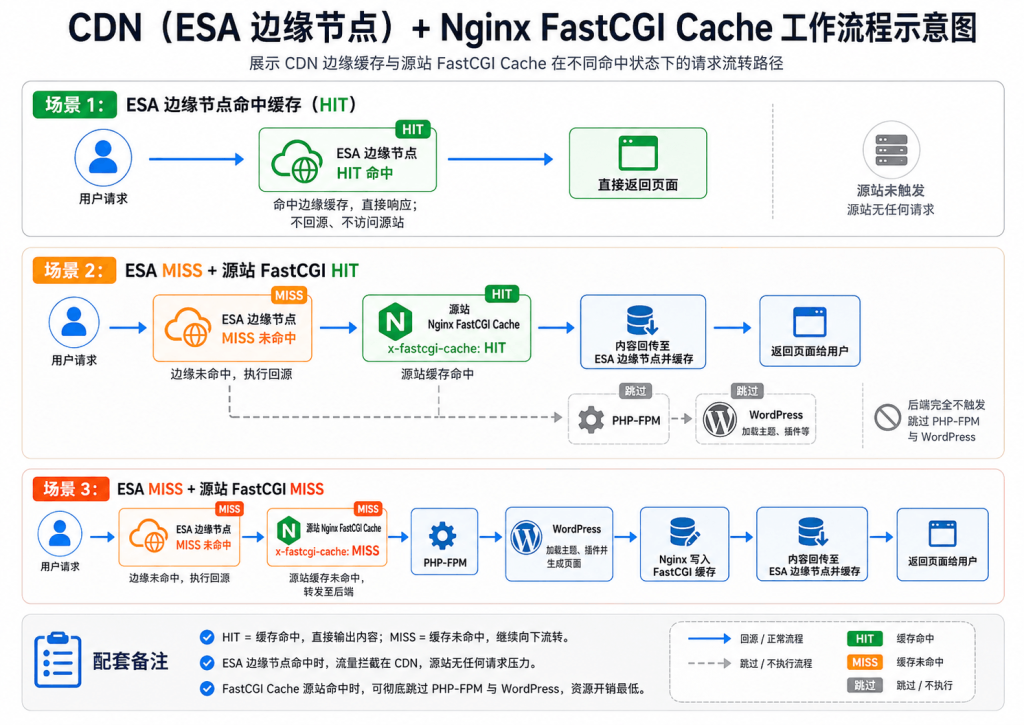
Three-layer architecture, each layer has a different purpose:
| Layer | Responsible for what | Cache Hit Rate Expectation |
|---|---|---|
| CDN Edge Cache | Handle 99% of traffic, users access from nearest node, significantly reducing latency | Higher HIT rate is better |
| Nginx FastCGI Cache | The last line of defense for the origin server. When CDN MISS and back to origin, the origin server does not run PHP either | As a fallback for CDN, ensuring back-to-origin requests are also extremely fast |
| PHP + WordPress | Only executed when both cache layers MISS. Generate new content and write to Nginx cache | The less triggered, the better |
Why is this architecture better than 「only CDN」 or 「only Nginx cache」?
Only CDN, no origin cache: Every CDN back-to-origin request goes through PHP → WordPress → database. When back-to-origin traffic is high, the origin server CPU is consumed by PHP. WP Panel's Nginx FastCGI Cache ensures that even when back-to-origin, HTML is returned directly from Nginx, with zero PHP load.
Only origin cache, no CDN: All requests hit the origin server. Although each request is extremely fast at the Nginx level, cross-region latency cannot be eliminated.
Both combined: CDN handles edge traffic + reduces latency, Nginx FastCGI Cache handles back-to-origin traffic + protects PHP. This is a production-grade WordPress caching architecture.
You can use browser DevTools to check your site's
X-FastCGI-Cacheresponse header — if it shows HIT, WP Panel's cache is working. If it shows MISS or BYPASS, check whether cache is enabled, TTL has expired, or the current request matches a bypass rule (e.g., you are logged in).
5. How to customize cache bypass rules?
This isWP PanelHighlight compared to traditional panels.You don't need to modify the Nginx main configuration file, nor repeatedly experiment in the location block. The panel backend provides two custom configuration entries:
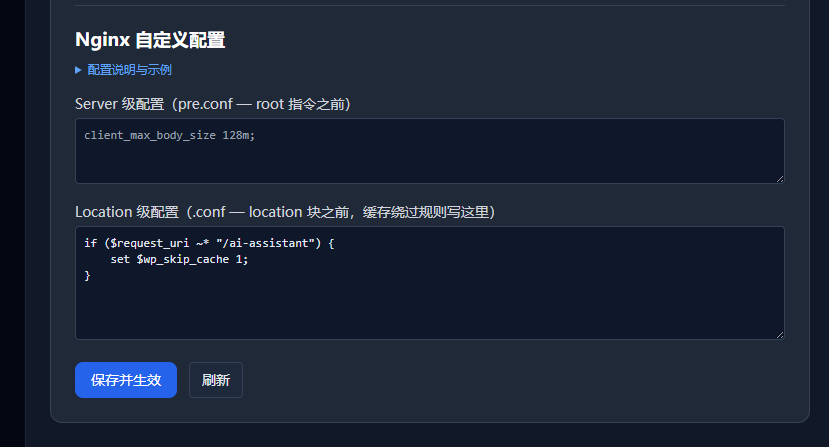
Entry Location
Site details page → Nginx Custom Configuration area, there are two input boxes:
| Entry | Configuration File | Scope of Action | Applicable Scenarios |
|---|---|---|---|
| pre.conf | /www/server/panel/nginx-custom/{域名}.pre.conf | rootBefore Directive | Upload size limit, early rewrite, custom variables |
| .conf | /www/server/panel/nginx-custom/{域名}.conf | rootAfterlocationBefore | Cache bypass rules, custom location, plugin rewrite |
Practical Examples
Scenario 1: A custom path bypasses cache
For example, if you have an AI chat page at /ai-assistant, each request needs real-time response. In .conf, add:
if ($request_uri ~* "^/ai-assistant") {
    set $wp_skip_cache 1;
}
Takes effect immediately after saving. The panel will automatically validate syntax; incorrect configurations will not be written.
Scenario 2: Custom Cookie bypasses cache
If your application uses a custom session cookie (e.g., my_app_session), and you don't want such users to see cached content:
if ($http_cookie ~* "my_app_session") {
    set $wp_skip_cache 1;
}
Scenario 3: Multiple path combinations
Multiple rules can be stacked, all paths share the same cache bypass logic:
if ($request_uri ~* "^/(ai-assistant|live-chat|real-time)") {
    set $wp_skip_cache 1;
}
Principle Explanation (for those who want to understand deeply)
The latest version of WP Panel's template initializes the $wp_skip_cache variable at the server level and executes it .confbefore the file:
server {
    set $wp_skip_cache 0;          ← 先初始化为 0(正常缓存)
    include .../域名.conf;          ← 然后加载你的自定义规则
                                     ← 你可以 set $wp_skip_cache 1 来绕过

    location ~ \.php$ {
        fastcgi_cache_bypass $wp_skip_cache;  ← 如果 =1 就跳过缓存
    }
}
This order ensures that your custom ruleswill not be reset by subsequent location blocks. This is a redirect semantics issue that needs careful handling in Nginx configuration, and WP Panel has already solved it at the template level.
6. When to use pre.conf and when to use .conf?
一个简单的判断标准:
| 你想做的事 | 用哪个 | 写法示例 |
|---|---|---|
| 改上传文件大小限制 | pre.conf | client_max_body_size 128m; |
| 添加自定义响应头 | pre.conf | add_header X-Frame-Options "SAMEORIGIN"; |
| 缓存绕过 | .conf | if ($request_uri ~* "/path") { set $wp_skip_cache 1; } |
| 自定义 location 块 | .conf | location ^~ /api/ { proxy_pass ...; } |
| 插件 rewrite 规则 | .conf | W3 Total Cache 或 WP Rocket 的 Nginx 规则 |
七、为什么选 WP Panel 做 WordPress 服务器管理?
说到缓存,其实只是 WP Panel 的冰山一角。给 WordPress 站长一个真实的对比视角:
| 你关心的事 | 传统面板的做法 | WP Panel 的做法 |
|---|---|---|
| page caching | 装插件、改 Nginx 配置、调试规则 | 建站自动配置,开箱即用 |
| 缓存绕过 | 手动写一长串 if 规则,挨个测试 | 内置 11 条智能绕过,覆盖登录/后台/电商 |
| 自定义规则 | 翻文档找 Nginx 配置路径,改错直接 502 | 面板内可视化编辑,语法错误自动拒绝保存 |
| 缓存清理 | 命令行或插件操作 | 面板一键清理 + 自动更换缓存 Key |
| PHP 加速 | 手动配置 Redis Object Cache | 面板自动部署,搭配 Nginx 缓存双重加速 |
| 服务器安全 | Each manages its own | Two-factor authentication + Random entry + Security log whitelist + Scan defense |
WP Panel is specifically designed for WordPress on Debian scenarios. It is not a general-purpose panel with a WordPress label, but every decision from Nginx templates, PHP-FPM Pool, MariaDB permissions to Redis cache is made with the security and high performance of WordPress sites as the starting point.
If your server mainly runs WordPress, WP Panel can save 90% of environment configuration and operation and maintenance debugging time.
8. Further optimization suggestions
After enabling FastCGI cache, you can also combine the following settings to take site performance and security to the next level:
- Enable Redis Object Cache — WordPress object cache (options, transient data, database query results) goes through Redis, significantly reducing database pressure
- Set cache TTL reasonably — For sites with frequent content updates, set 1-2 hours; for static content-dominated sites, extend to 24 hours or even longer
- Combine with CDN — Nginx cache accelerates the origin server, CDN handles edge node distribution, each doing its own job
- Monitor cache hit rate — via
X-FastCGI-CacheObserve the HIT/MISS ratio in response headers; a high MISS rate indicates overly broad bypass rules. - Exclude paths that truly do not need caching — such as real-time data interfaces and Webhook callback URLs, use the above
.confcustom rules to precisely exclude them.
The design principle of WP Panel's Nginx cache system is simple:It covers 99% of WordPress scenarios by default, leaving the remaining 1% with a simple and reliable custom entry for users.No need to search through dozens of lines of Nginx configuration to find where to put set $wp_skip_cache — the panel has already set up the framework for you; you only need to tell it which paths not to cache.
9. How to Enable Nginx FastCGI Cache in WP Panel
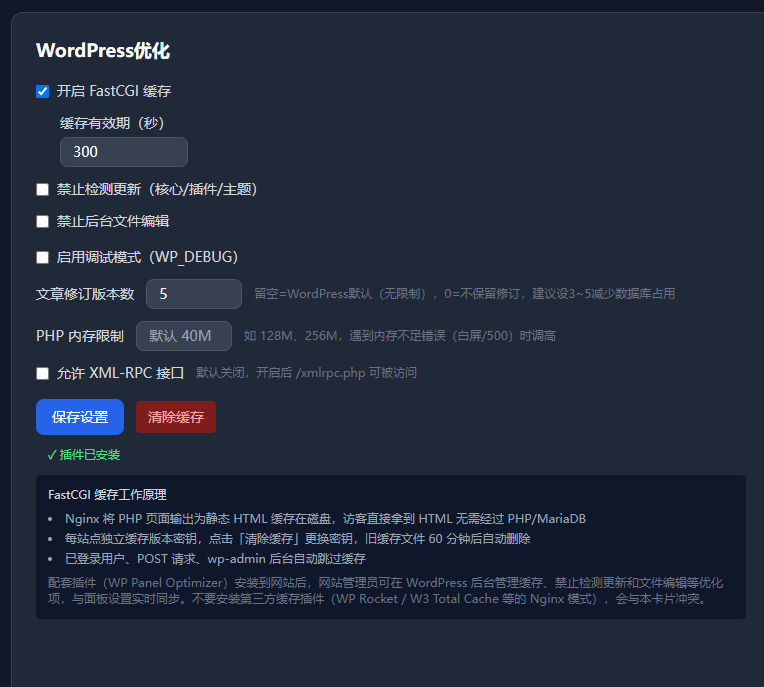
Enabling FastCGI cache in WP Panel is very simple. Just go to the site details page, find WordPress Optimization, check Enable FastCGI Cache, and save the settings. The FastCGI cache for this site is now successfully enabled.
For convenient automatic cache clearing on a daily basis, after saving, an option to install a plugin will appear. Click Install Plugin, then activate the plugin in the WordPress admin. From then on, whenever you publish or edit a post in the WordPress admin, the cache will be automatically cleared. It's very convenient, and you don't need to configure any rules at all — truly out-of-the-box.