Reinstall WP Panel on BT Panel and Restore Websites
WP Panel is a control panel that is more suitable for building and managing WordPress websites than BT Panel. This tutorial will provide complete guidance on how to reinstall your current BT Panel server with WP Panel, and restore the websites created on the original BT Panel without losing website data.
Step 1: Back up BT Panel website data
Log in to your BT Panel backend, go to the website list, click backup for all websites that need to be restored after reinstalling WP Panel, and then download the backups to your local machine. If you have multiple VPSs, you can also download to another VPS for faster speed. (For how to download, you can ask Doubao for guidance.)
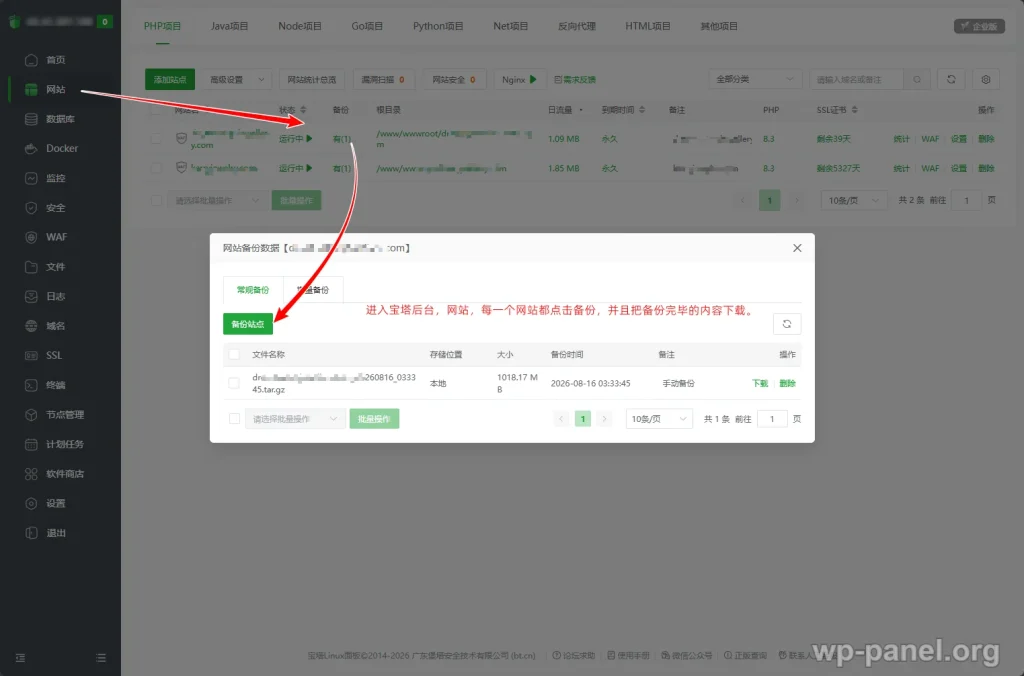
After backing up website files, go to the database list, back up all databases that need to be restored and download them to your local machine (databases are usually small, so downloading directly to your local machine is also fast).
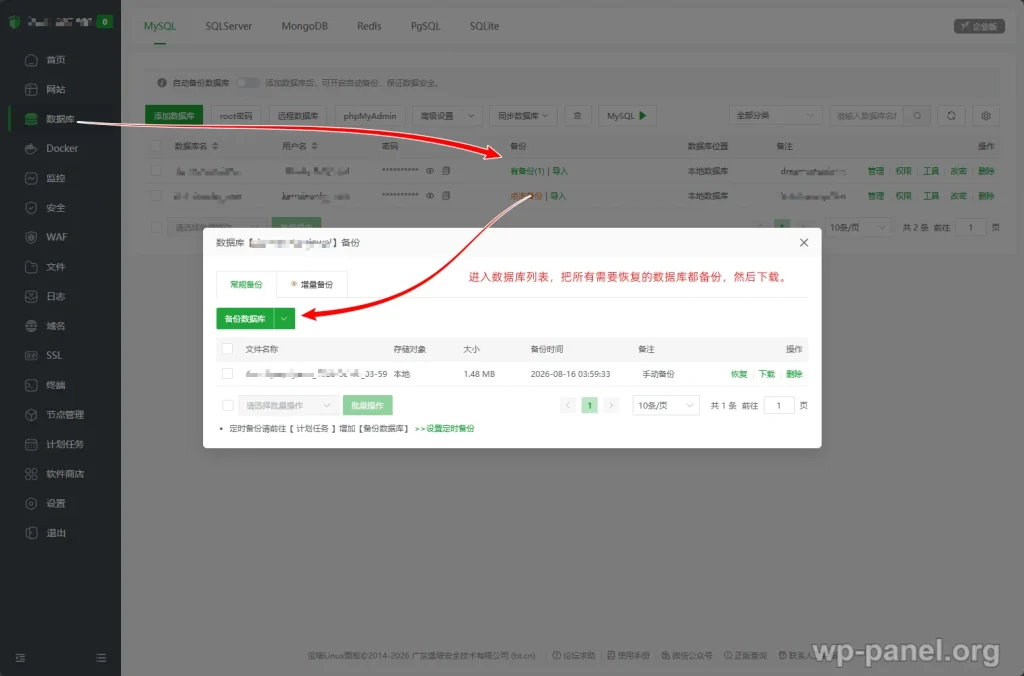
Note: Reinstalling WP Panel requires reinstalling the system, and all content on the server will be lost at that time.Please ensure that you have backed up website files, database files, and any other content you need to back up. Before starting, it is also recommended to readBackup and Restore Instructions。
Step 2: Reinstall the system to Debian 13
Go to your server management backend, find the system reinstall option in the server details page, and select Debian 13 to reinstall.
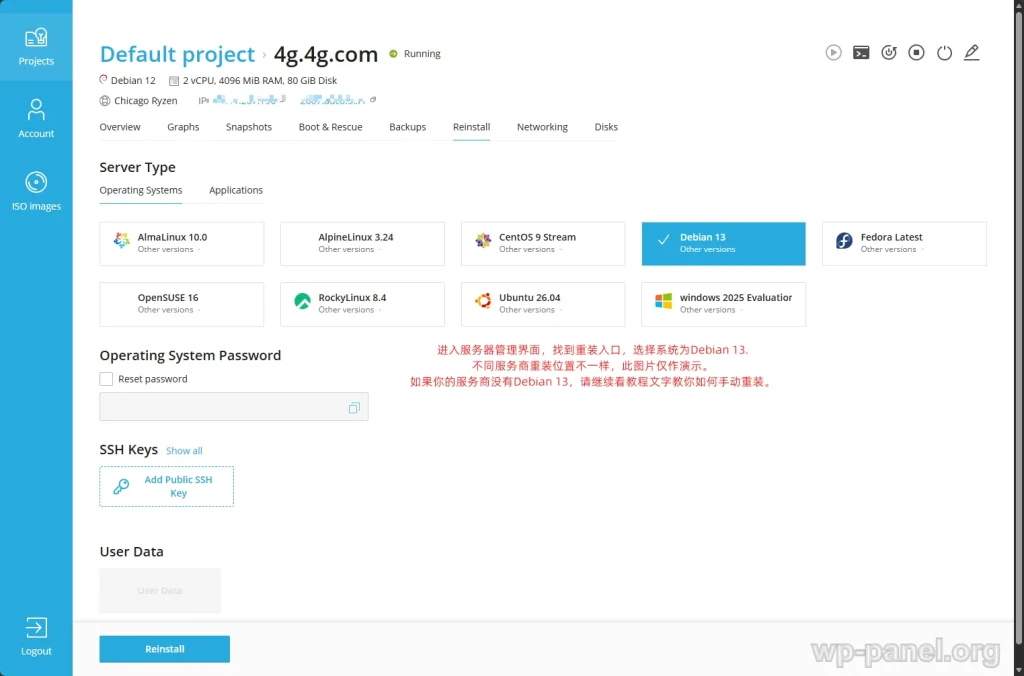
If your service provider's reinstall interface does not have Debian 13, you can use the following script to reinstall Debian 13 with one click.
In the original BT Panel backend, go to the terminal (or connect via SSH software), copy the script below and press Enter:
curl -O https://raw.githubusercontent.com/bin456789/reinstall/main/reinstall.sh || wget -O ${_##*/} $_For domestic servers, use the following script:
curl -O https://cnb.cool/bin456789/reinstall/-/git/raw/main/reinstall.sh || wget -O ${_##*/} $_After downloading, continue to execute the following command:
bash reinstall.sh debian 13Then, according to the script prompts, you will be asked to manually set the account password and other operations. You can just press Enter, and finally the username and password after reinstallation will be printed.
Enter the following command to restart the VPS.
rebootAfter restarting, the system will automatically enter the Debian 13 installation interface. This process takes a few minutes.It is recommended to wait at least 10 minutes before connecting to the VPSto avoid installing WP Panel before the reinstallation is complete, which may cause failure.
Step 3: Install WP Panel
If this is your first installation, you can also refer toInstallation, Login, and Updatesto understand installation requirements and first login precautions.
After waiting at least ten minutes, reconnect to the VPS using an SSH tool, copy the installation script from the WP Panel official website, paste it into the SSH window, and press Enter.
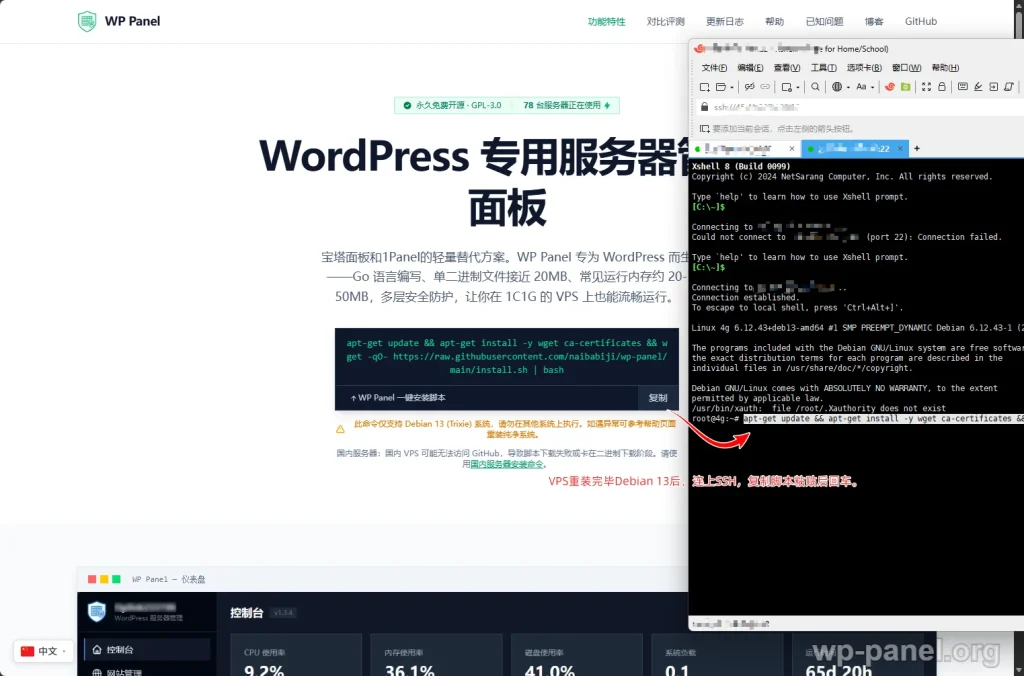
For overseas servers, please copy the following script:
apt-get update && apt-get install -y wget ca-certificates && wget -qO- https://raw.githubusercontent.com/naibabiji/wp-panel/main/install.sh | bashFor domestic servers, please copy the following script:
apt-get update && apt-get install -y wget ca-certificates && wget -qO- https://gh.wp-panel.org/https://raw.githubusercontent.com/naibabiji/wp-panel/main/install-cn.sh | bashThe entire installation process is automatic. After a few minutes, the installation result will be output. Copy and save this information.
Step 4: Restore website data
Since we are reinstalling BT Panel to WP Panel on the same server, we can directly install websites and restore them without re-resolving the domain.
1. Create a website
After logging in to the WP Panel backend, go to Website Management on the left → Create Website → Fill in the domain → Check Apply for Certificate → Create.
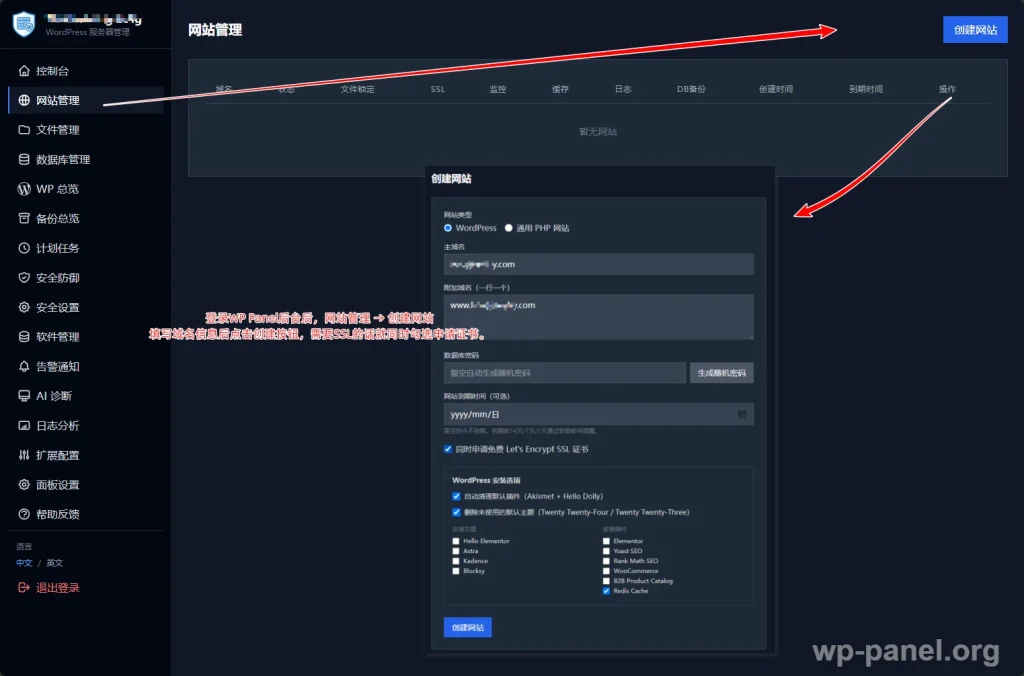
2. Upload backup files
For more instructions on uploading, extracting, and fixing permissions, please seeFile Management and Databases。
After creating the website, click [Files] in the website list, or enter the website details and click [File Management].
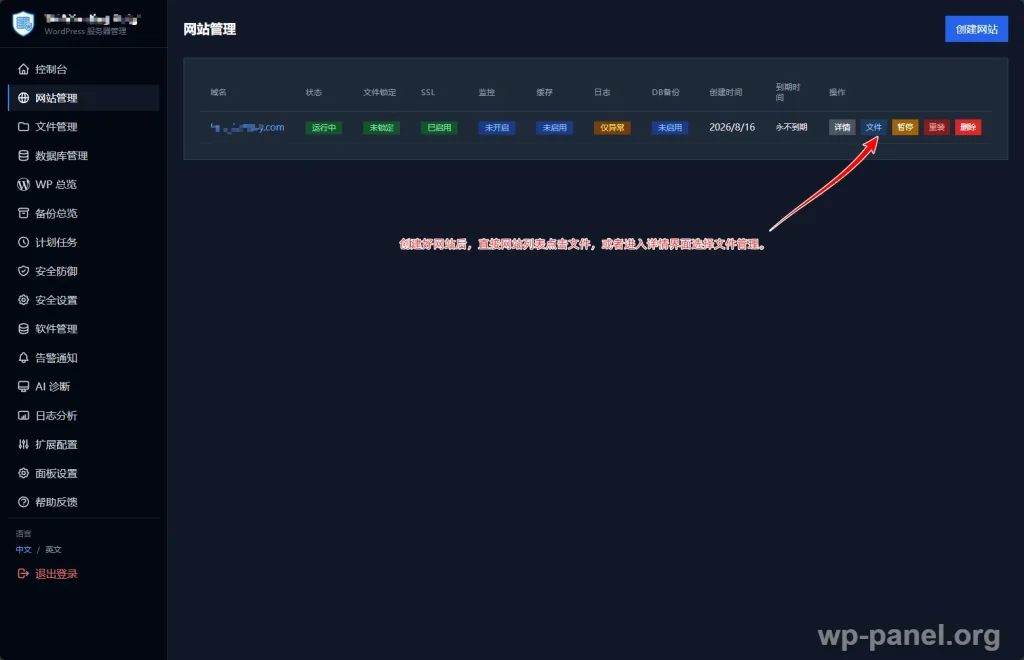
After entering the website root directory, select the backup file you uploaded earlier in the upper right corner, then extract it. (If you downloaded it to another server earlier, directly download the data from that other server to the website root directory of the current server and extract it. For the method, continue asking Doubao.)
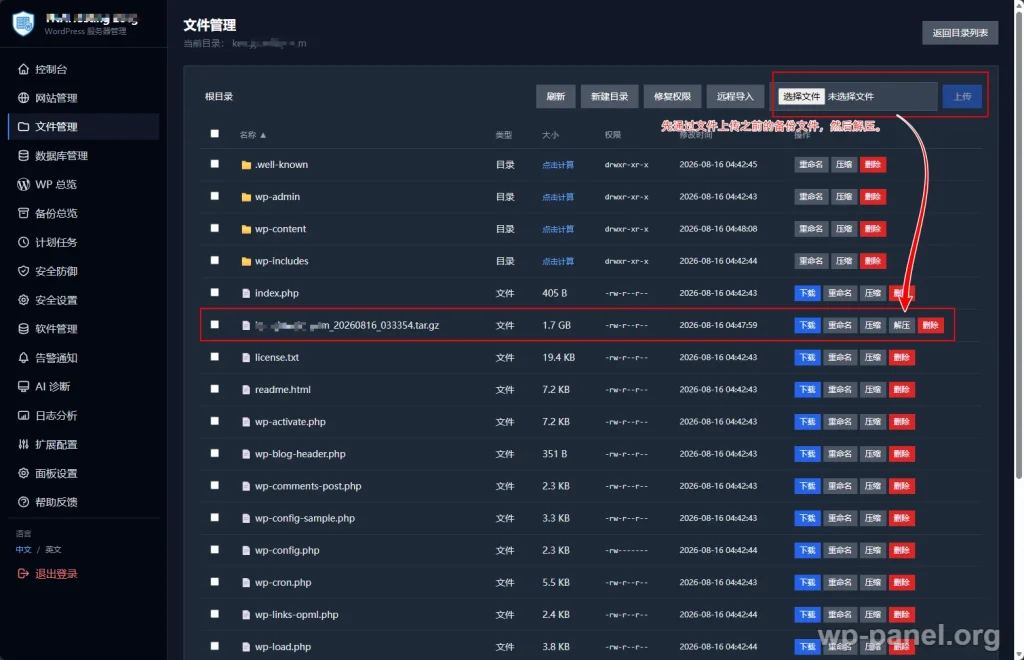
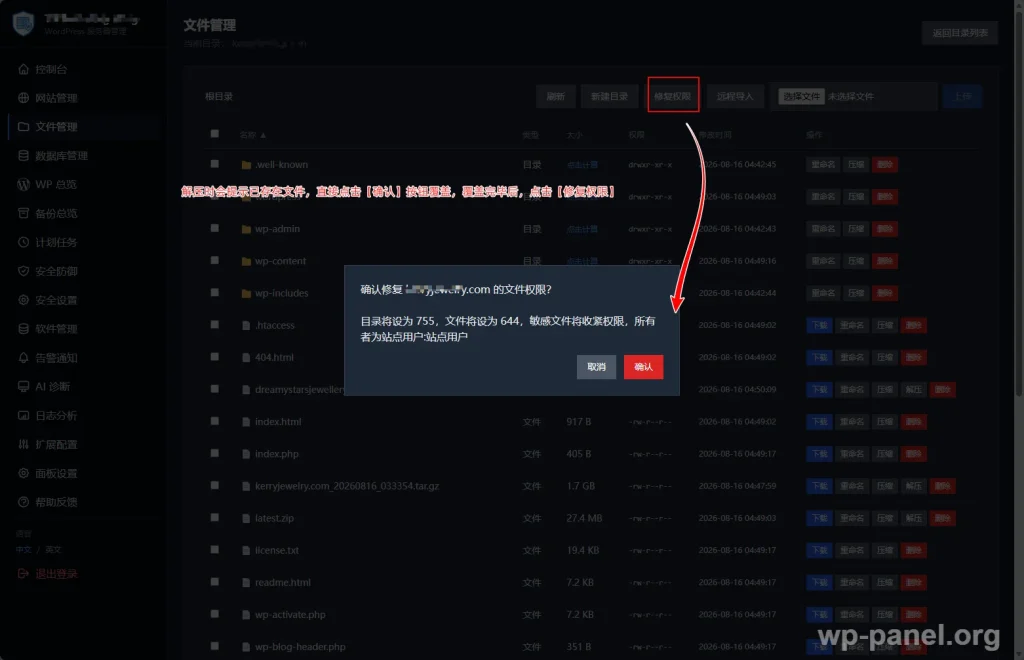
During extraction, a prompt will appear indicating that the file exists. Click the [Confirm] button to overwrite. After overwriting, click the [Permission Repair] button in the upper right corner.
3. Restore the database file
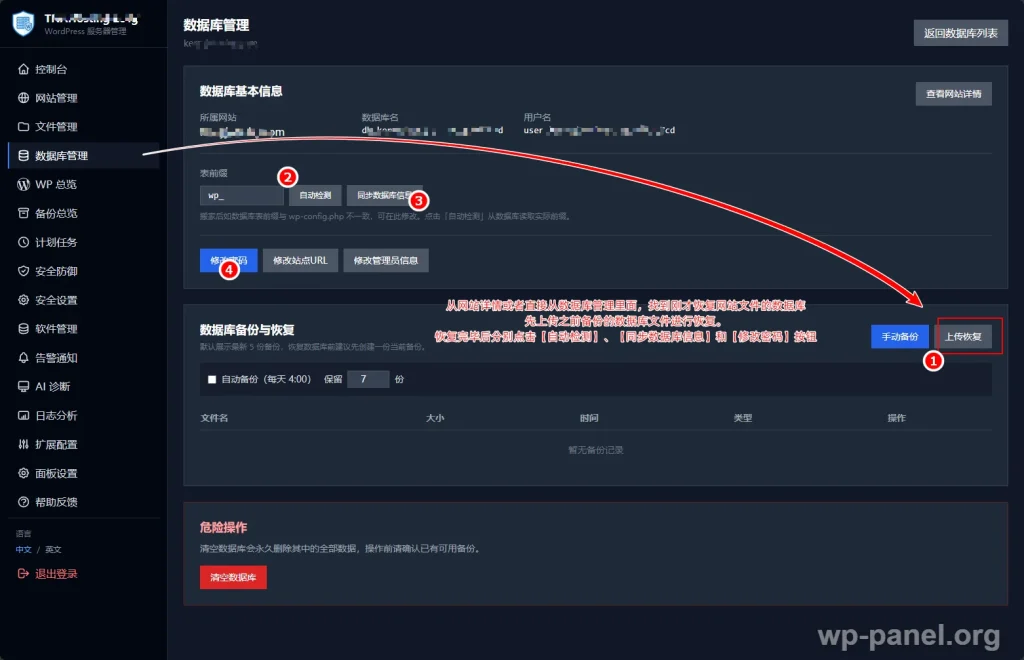
Enter the database corresponding to the website you just restored via the website details page or directly from the database management menu.
First, use the upload and restore button to restore the database content;
Then click the [Auto Detect], [Sync Database Info], and [Change Password] buttons respectively.
The WP Panel will automatically write the new database account password and other information into the wp-config.php file.
4. Website restoration successful, optional optimizations follow
At this point, you can directly open your website in a browser to test access. If there are no unexpected issues, the website should now be accessible normally.
Panel optimization:
- Enter panel settings, modify BasicAuth authentication and the panel web login account password;
- Check the panel auto-update option;
- Configure SMTP and alert rules in the alert notifications;
- In software management, make personalized adjustments to the configuration (there is simple help in the upper right corner of the interface);
- In the backup overview, click „Remote Backup Settings“ in the upper right corner, and choose SSH or S3.
Website optimization:
- On the website details page, enable website monitoring;
- Enable FastCGI cache (you need to delete other cache plugins on the website to avoid conflicts);
- Optionally enable the file protection feature;
- Check auto backup in the database details;
- Create a website backup task in scheduled tasks;
- Enter the website backend and enable the accompanying panel optimization plugin and Redis Cache.
Continue Reading
Summary and Feedback
The above is the complete process of replacing BT Panel with WP Panel on the same server and restoring website data. If you encounter any problems during the migration process or while using WP Panel, you can contact the developer directly through the Help tab in the panel backend.