Installation, Login, and Updates
Install WP Panel from a clean Debian 13, complete the first login, daily updates, and migration preparation.
Before Installation
- Use a clean Debian 13 system and have root or sudo privileges ready.
- Minimum recommended: 1 CPU core, 1GB RAM;
- An SSH client, for example:Xshell Free Edition
Installation and First Login
After logging into the server via SSH, run the official installation command (Xshell 8 VPS Connection Tutorial: A Complete Guide to Remote Linux Server Login from Windows):
apt-get update && apt-get install -y wget ca-certificates && wget -qO- https://raw.githubusercontent.com/naibabiji/wp-panel/main/install.sh | bash- Wait for the script to complete the system environment and panel installation.
- Save the HTTPS address, security entry, username, and password displayed after installation.
- After first login, check in Software Management that Nginx, PHP-FPM, MariaDB, Redis, and Fail2ban are working properly.
The panel uses a random security entry and provides both BasicAuth and web login protection. Do not expose full login information in tickets, chat logs, or screenshots.
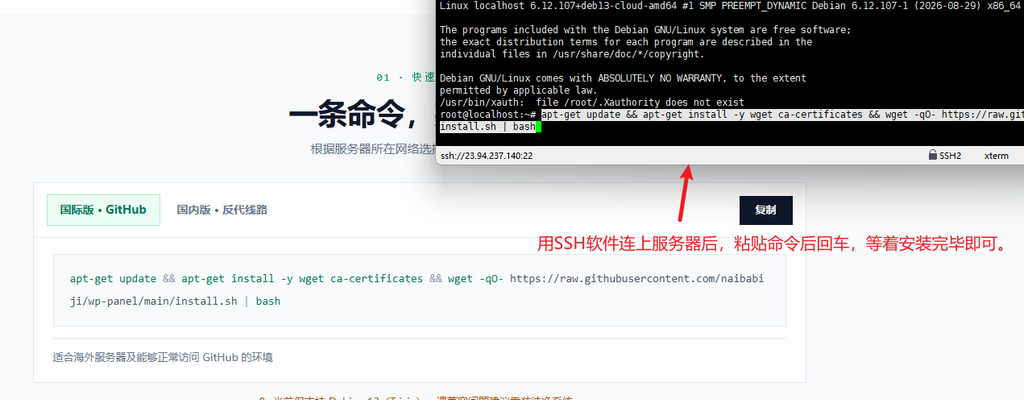
Domestic Network Installation Entry
If GitHub is not reliably accessible, you can use the domestic entry. It only selects an available download source; the installation body still uses the same installation script:
apt-get update && apt-get install -y wget ca-certificates && wget -qO- https://gh.wp-panel.org/https://raw.githubusercontent.com/naibabiji/wp-panel/main/install-cn.sh | bashWhen is it necessary to reinstall Debian
Most VPS providers' Debian 13 can directly install WP Panel. Only consider reinstalling a clean system when the installation script keeps failing, basic services cannot start, or the server has residual environments from other panels that cannot be reliably cleaned.
- Reinstalling will wipe the system disk; websites, databases, certificates, SSH configurations, and local backups may be permanently lost.
- First, save backups to another server or local computer and confirm the backups can be read.
- Record the server's public IP, gateway, DNS, SSH keys, and provider console login method.
- Prefer the Debian 13 minimal installation provided by the VPS provider's console.
- OpenVZ and LXC virtual machines are not suitable for third-party overlay reinstall scripts; contact your provider for handling.
Do not treat system reinstallation as a routine troubleshooting step. Only execute it when you have prepared off-site backups and can accept downtime.
Method 1: Use the VPS provider's console
Prefer the system reinstall feature provided by the cloud or VPS provider„s console. Select Debian 13 (Trixie) 64-bit; if there is a “minimal installation„ option, enable it. After installation, log in with the new password or SSH key provided by the console, then run the WP Panel installation command.
If the provider's Debian template is heavily customized and the same system component issues persist after reinstallation, then consider third-party reinstall scripts or the official Debian ISO.
Method 2: Use the bin456789/reinstall script
This is a third-party open-source project and does not belong to WP Panel. Before running, read the project's latest instructions and confirm that your server's virtualization type is supported. First, download the script:
# GitHub 连接正常
curl -O https://raw.githubusercontent.com/bin456789/reinstall/main/reinstall.sh || wget -O ${_##*/} $_

# 中国大陆备用源
curl -O https://cnb.cool/bin456789/reinstall/-/git/raw/main/reinstall.sh || wget -O ${_##*/} $_Execute Debian 13 reinstallation
After downloading and reading the project instructions, execute the following command. The script will prompt you to set the username, password, or SSH key after reinstallation, and will start overwriting the system disk after the server reboots:
bash reinstall.sh debian 13- Confirm again that backups are stored outside the current server.
- Set login information as prompted by the script and keep it safe.
- Execute
rebootand wait for the system reinstallation; SSH connection disconnection is normal. - Monitor the installation progress via the provider's console. After completion, you can usually reconnect via SSH on port 22.
- After logging into the new system, first complete system updates, then install WP Panel.
The reinstallation process takes some time. It is recommended to wait at least 10 minutes before installing the WP Panel.
Method 3: Use the official Debian ISO
For dedicated servers or VPS that support custom ISO or IPMI, it is recommended to manually install using the official Debian netinst image. During installation, select only necessary system tools and SSH Server, and avoid pre-installing other panels or web environments.
Panel Updates
On the settings page, you can check for and install stable versions. The panel will verify the downloaded files and release signatures, back up the panel database before updating, and check the panel's health after starting the new version.
Automatic Update Scope
Panel automatic updates are disabled by default. When enabled, any stable official release higher than the current version will be installed, regardless of whether it is a patch, minor, or major release; pre-release versions such as Beta and RC will not be installed automatically.
- After the panel first detects a new version, it will observe for at least 24 hours by default before attempting installation within the update time window set by the administrator.
- If the GitHub version check fails, the most recent check result will be displayed, and a retry will occur approximately 30 minutes later within the update time window; the estimated check time is based on server time.
- Servers upgrading from the old „patch-only“ policy that already had automatic updates enabled will first have automatic updates safely disabled. After the administrator confirms acceptance of all stable official releases, automatic updates must be re-enabled on the settings page; servers that did not have it enabled will remain disabled.
- Automatic updates and manual updates use the same signature, digest, backup, health check, and failure rollback protections.
For domestic networks, you can configure a GitHub reverse proxy address, but do not disable integrity and signature verification. If an update fails, first check the operation logs and automatic rollback results, and do not manually overwrite the panel database.
If the system software source refresh fails, or if manual selection is required when upgrading packages, the panel will only display a brief prompt. Please check the APT status via SSH and complete the system update; such system-level issues are not suitable for repeated retries on the web page.
Manual migration from other panels
The „Site Migration“ feature only supports two WP Panel instances with the same version. When preparing to convert from BaoTa to WP Panel on the same server, refer toReinstall WP Panel on BaoTa Panel and restore websites; if both the source and destination servers have the same version of WP Panel installed, use theSite Migration featurefor convenience. For migrating from other panels to WP Panel, you can follow the manual steps below:
- Back up website files and databases separately on the original server.
- Create a website with the same domain name in WP Panel.
- Upload and extract the files, then execute „Fix Permissions“.
- In the database details, upload and restore the SQL backup, then check the table prefix and site address.
- Before switching DNS, check the frontend, backend, SSL, scheduled tasks, and email sending.